Today I’d like to tell you about something good that can be very useful for anyone using Google Pay, more popularly known as GPay. If you’re like me, you may have signed up for automatic payments or subscriptions for convenience, and now you wish to cancel them.
Whether it is Amazon Prime, Netflix, Hotstar, or Jio Cinema, the process of How to Cancel Autopay in GPay. Do not panic, I have gone through the process myself. Hopefully, my story can clear the way for you.
I remember the first time I tried to cancel autopay I was anxious about doing something wrong like unsuscribing by mistake or stopping the payment for something I needed. But, after carefully navigating the steps, I was able to do it with ease. Today, I will explain to you the steps about How to Cancel Autopay in GPay and tell you the way you should not be charged again for the subscriptions that you no longer use.
What Is Autopay in GPay?
Let’s start with the autopay cancellation process. First, we need to know what does autopay mean in GPay. Autopay is an option that allows you to set up a service such as a streaming platform, utility bill, or another subscription in a way that you don’t have to manually approve each transaction or sign-in period every month. Once you sign up for it, GPay takes the amount automatically from your bank account.
See also – How To Change billing address in Amazon
Steps to How to Cancel Autopay in GPay
Now, let’s move on to the most important part of this article — how to cancel autopay in GPay. Here’s a step-by-step guide on how you can revoke a live mandate.
1. Open the Google Pay App

To start, you’ll need to have your mobile device handy. Open the Google Pay app from your home screen. If you’re not already logged in, sign in using your credentials.
2. Access Your Profile
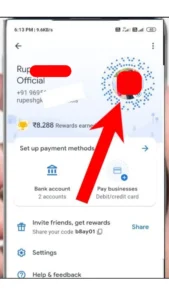
Once you’re in the app, look at the top right corner. You’ll see your profile picture or icon. Tap on it to access your account settings.
3. Select the Autopay Option
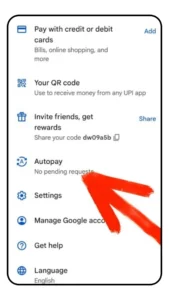
In your profile settings, you’ll see several options. Look for the “Autopay” option and select it. This is where all your active mandates are listed.
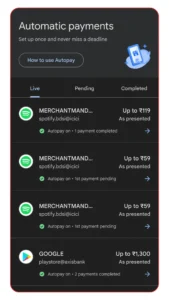
4. Find the Live Mandates

Once you tap on “Autopay,” you’ll be taken to a new screen. Here, you’ll see two tabs: “Live” and “Paused.” Under the “Live” tab, you’ll find all the active autopay mandates that are currently running.
5. Choose the Mandate You Want to Cancel
Scroll through the list and find the subscription or payment you wish to cancel. For instance, if you want to cancel autopay for Amazon Prime, Netflix, Hotstar, or Jio Cinema, tap on the specific mandate.
6. Pause or Cancel Autopay
Now, you have two options. You can either “Pause autopay” or fully cancel it. If you choose to pause it, you can specify a start and end date during which the autopay will be paused. This option is useful if you want to take a break from the service but plan to resume it later.
To completely cancel autopay, simply proceed without selecting a pause date.
7. Confirm Your Action by Entering UPI PIN
After choosing your desired action, you will be asked to enter your UPI PIN. This confirms your identity and ensures that the change is intentional.
8. Check the Status
Once you’ve confirmed your action, go back to the “Live” tab. You should see that the autopay mandate is no longer active. If it’s paused, it will move to the “Paused” tab.
| Sr. No. | Step | Action |
|---|---|---|
| 1 | Open Google Pay | Launch the app on your mobile device |
| 2 | Go to Profile | Tap your profile picture in the top right corner |
| 3 | Select Autopay | Find and select the “Autopay” option |
| 4 | Choose Subscription to Cancel | Find the subscription in the “Live” tab |
| 5 | Pause or Cancel Autopay | Choose to pause or cancel the autopay |
| 6 | Enter UPI PIN | Confirm your decision by entering your UPI PIN |
| 7 | Check Status | Confirm cancellation or pausing in the “Live” tab |
How to Cancel Autopay for Specific Services in GPay
You might have specific subscriptions that you want to cancel. Below are detailed steps on how to cancel autopay in GPay for some popular services like Amazon Prime, Netflix, Hotstar, and Jio Cinema.
1. How to Cancel Autopay in GPay for Amazon Prime
Subscriptions to Amazon Prime are very often the case, and you might think of deactivating the option of automatic payment if you don’t participate with the respective service any more. Simply go through the same process that is mentioned above, and find Amazon Prime on the “Live” tab. Once you see it, tap on it, and click “Pause” or “Cancel”.
2. How to Cancel Autopay in GPay for Netflix
Those of us that make use of the Netflix site yet another common service. If you no longer feel Netflix is necessary or you just want to break the habit, do just as previously advised. Get to your Autopay settings in GPay, locate Netflix in the “Stay” tab, and de-activate the subscription through inputting your UPI PIN.
3. How to Cancel Autopay in GPay for Hotstar
Hotstar subscriptions can also be canceled easily through GPay. Follow the autopay cancellation steps, and locate Hotstar in the “Live” tab. Proceed with cancellation just like with any other subscription.
4. How to Cancel Autopay in GPay for Jio Cinema
Finally, if you’ve subscribed to Jio Cinema and wish to stop autopay, you can do so by accessing your profile in GPay and canceling the autopay mandate for Jio Cinema under the “Live” tab.
Alternate Methods to Cancel Autopay
If you have trouble finding a subscription in GPay or prefer other methods, you can also cancel autopay through your bank or Google Account settings.
1. Contacting Your Bank
You can cancel your autopay directly with your bank in order to make the payment stop. A majority of the banks require you to go to their official website to cancel the autopay or talk with the customer service to do it personally. Make sure to get you the right information by asking the bank if you want to use this method. This allows you to get your funds at the destination bank where you keep your money.
2. Google Account Settings
If you are having a hard time disbanding the auto payment via GPay app, you can look for it in your Google account settings. Read on to learn how to do it:
- Go to your web browser and log in to your Google Account
- Navigate to the “Payments & Subscriptions” section.
- Under “Manage Subscriptions,” locate the subscription you want to cancel.
- Follow the instructions given to you to cancel the autopay.
Make sure you find the confirmation notification of the withdrawal has been processed. This way, you’ll know for sure that you won’t be charged again.
Key Points to Remember
Canceling autopay in GPay is a simple process, but here are a few things to keep in mind:
- Check Your Subscription Status: After you’ve canceled or paused a mandate, always go back and check the status in the “Live” tab to ensure the action was successful.
- UPI PIN: Make sure you remember your UPI PIN. You’ll need this to confirm the cancellation.
- Bank Assistance: If you’re having trouble canceling through GPay, don’t hesitate to contact your bank or financial institution.
- Google Account Backup: If all else fails, check your Google Account settings to manage your subscriptions.
- Double Check for Confirmation: Always ensure that you receive confirmation of cancellation to avoid any unexpected charges in the future.
FAQs
What is Google Pay Auto Payment?
Google Pay Auto Payment is one of the things that come with a feature that lets you pay the bills or the made payments that are automatic by the use of your linked bank account or UPI ID. After you have set up auto payment for some service, Google Pay will then withdraw the said amount from your account on the day it is due for payment.
How to Set Up Auto Payment on Google Pay?
Open Google Pay App: Launch the Google Pay app on your smartphone.
Select “Pay Bills”: Tap on the “Pay Bills” option.
Choose a Biller: Select the biller for which you want to set up auto payment.
Enter Bill Details: Provide the necessary bill details, such as account number, customer ID, and due date.
Enable Auto Pay: Look for the “Auto Pay” option and enable it.
Confirm and Submit: Review the details and confirm your auto payment setup.
What Types of Bills Can I Pay Automatically?
You can use Google Pay Auto Payment for a variety of recurring bills, including:
Utility Bills: Electricity, water, gas
Subscription Services: OTT platforms (Netflix, Amazon Prime), music streaming services, gym memberships
Loan Repayments: EMI payments for loans
Insurance Premiums: Life insurance, health insurance
Is Auto Payment Secure?
Definitely, Google Pay Auto Payment is secure. It is equipped with cutting-edge technology that ensures the safety of your monetary details. Besides, you can add two-factor authentication (2FA) for extra safety.
Can I Change the Auto Payment Amount or Due Date?
Yes, you can modify the auto payment amount or due date. To make changes, follow the same steps as canceling auto payment and update the relevant information.
Conclusion
Are you tired and search How to Cancel Autopay in GPay? Did you know that the inconvenience can be avoided with the right know-how? Here’s a quick solution – you can quench the repeated payments for Amazon Prime, Netflix, Hotstar, and Jio Cinema. Once you hit the Google Pay app or if you choose another option of your bank or Google Account settings to make the payment you have plenty of choices with you.

Welcome to TrackingMyOrder, your essential guide to mastering the digital world. I’m Lavkush Shingane, and I’m here to simplify your online experience. Whether you need to track an order, delete or activate an account, manage your social media presence, or cancel subscriptions, we provide clear, step-by-step instructions. Our goal is to help you efficiently handle all aspects of your online activities.